Once you’ve set up your bow and you’re comfortable shooting it, you need to ensure the bow is shooting arrows efficiently and reliably. The bow must be “forgiving,” which means moderate mistakes when executing a shot don’t cause huge problems at the target.
Two types of tuning help achieve great groups on the target: micro tuning and bare-shaft tuning. Before using either tuning method you must ensure your bow’s center-shot is properly set. To test it, you should visit a long-distance archery range and do a “walk-back test,” which means shooting and then moving back. This test ensures your arrows fly straight between the shooting line and your longest distance, typically 60 or 70 meters.
To conduct this test, you must first find an accurate 30-meter mark on your sight, and then set up an aiming spot (a dot or target) at the top of the bale where you won’t miss high. Next, shoot one arrow at the spot from 30 meters, and then move back three steps and shoot another arrow while aiming at the spot. Repeat this three-step, one-shot process until you run out of room at the bottom of the target. In other words, stop shooting before you miss the bale low.
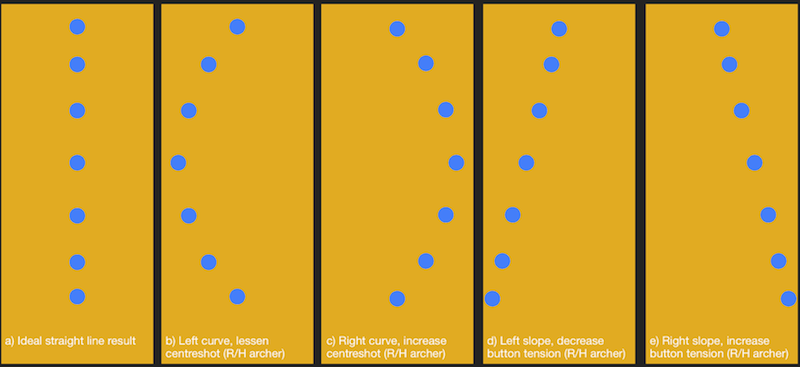
Your arrows will form a vertical pattern on the target, preferably a straight line down the middle of the bale. If the pattern looks like a forward or backward “C,” you must adjust your bow’s center-shot left or right. If your arrow pattern starts and finishes near the bale’s center, but the middle section bulges to the left, you must adjust your plunger to the right. To be clear, you adjust the entire plunger’s depth, not the spring tension. If the pattern’s middle section bulges to the right, you must move your plunger to the left. These instructions are the same for left- and right-handed archers.
If a diagonal line is formed where the arrows start in the middle at the top and drift off to one side near the bottom, two things could be happening: you are not holding your bow perfectly vertical, or your spring tension is too stiff or weak. For a right handed archer, a pattern that goes to the left means that your plunger tension is too high, and a pattern to the right indicates a very weak tension. The opposite applies for left-handed archers.
Bare-shaft tuning is all about the arrow flying from the bow as straight as possible so it loses no energy from fletching trying to correct poor flight. This tasks requires shooting fletched shafts and bare shafts, and then comparing the results to determine the arrow’s natural flight path. You’ll shoot at 18 meters (20 yards) or 30 meters (about 33 yards). You might also try shooting 70 meters, but shooting bare shafts that far can be frustrating, especially if you’re new to tuning.
The position of your bare shafts in relation to your fletched shafts indicates what you’ll do next. If the bare shafts hit above the fletched shafts, your nocking point is low and you must move it up. The adjustment will vary by distance, so experiment by moving the nock in small increments. Likewise, if your bare shafts hit below the fletched shafts, you must move your nocking point down.
If your center-shot is set correctly, you can now assess your arrow’s stiffness. Watch this video by Scott Einsmann from Archery 360 for an in-depth look at bare-shaft tuning and fixing arrow stiffness.
The other method, micro tuning, can be done once your bare shafts hit within your fletched shafts. Micro tuning requires lots of recording and documentation to get the best results. This step requires shooting your competition distance (most likely 70 meters), and varying your plunger’s spring tension until your group shrinks as much as possible.
Start by reading your plunger’s instruction manual, if one is provided, and set your plunger’s spring tension anywhere on the manufacturer’s recommended range of settings. Next, shoot three to five groups at this setting. An easy way to measure your group is to take your bow stringer, or any long string, and wrap it around the group to measure the length around your arrows.
Document that length for each plunger tension setting and for each group you shoot. After you finish one setting, increase or decrease the plunger’s spring tension by a half-turn and repeat the process. Cover as much of the spring’s tension range as possible. If you first increase the spring’s tension, make sure you look to see what happens if you also decreased the spring tension.
After reviewing your data, choose the setting that produced the tightest group. From there, test the spring tensions around that setting, varying the tension by smaller increments (1/4 turn, 1/8 turn, etc).
Make sure you’re comfortable with your equipment and shot execution when tuning your bow. Tuning cannot solve form issues. Also, never let someone else tune your recurve for you. This is your equipment, and other archers won’t shoot your bow exactly as you do. Tuning takes lots of time and effort, but the results are worth the work.